Showing posts with label flowers. Show all posts

Thursday, November 26, 2015

Exploding Doodles

Greetings Artsy friends. I'm so happy you've come. I hope you can stay a while, join me for a cup of tea/coffee and maybe an artsy chat. Lets get to know each other this year.
You can also connect with me on:
Facebook - Danine Mroz
Instagram - Northern Gypsy @bees_knees_studio
Twitter - Sky @PrairieMroz
Pinterest - Danine Mroz

Holy Exploding Doodles Batman!!

I'm thrilled that so many people have joined the "Doodle" movement. Everywhere I look now I see Adult colouring books... Drug Stores, Book Stores, Craft Stores, Department Stores and Art Supply Stores are all carrying a large variety of doodle books. One of my favourite doodle artist has a few colouring books out. He goes by the name "Squidoodle" his work is that stunning... he can also be found on Instagram and Facebook under that name. Hint, Hint... they make great gifts and stocking stuffers. 

So, while colouring is a great way to de-stress and is a ton of fun, I would highly encourage you to give doodling a try for yourself. It's easy, relaxing, and very rewarding. Honest!  Remember the kid in school... the one who doodled all over every page and cover of their notebooks? You can be that kid. That kid didn't fret if their work was particularly good.  They were just passing time, making marks, zoning out, relaxing and having fun. And guess what? Research now shows that when a person doodles while listening to a presentation/lecture the information is retained at a higher level...
Tangles: Wist (left) C-Yeah (right)
Imagine that!  In fact some schools are now encouraging kids with ADHD to doodle. As an artist that thrills me. The other amazing side affect of doodling is increased hand-eye co-ordination and spacial awareness. Therefore all other work becomes better as well. Hip-Hip-Hooray!! 

You may be wondering where to begin... Well, wherever you are is always a good place. There are a ton of different types of doodles, from simple geometric patterns to large intricate designs. Of course we start at the artistic level that we currently are at. I have found Pinterest is one of the best places for step-by-step instructions on various doodle patterns. In fact, I have quite the collection of 'Zendoodle How To's' on my Pinterest site PrairieMroz. Simply choose 3 or more patterns, practice them and then create a "thread". From there you fill  in between the lines and your patterns comes together.

Another method that I have found is #1 - Draw a simple object using an "Elegant Writer" calligraphy
pen.  Give it it's basic characteristics and then draw lines within. #2 - Add water with a medium water colour paint brush and watch the magic happen. I love how the pens colours flow and bleed... let it move about the page. (Allow to dry). #3 - Colour with some watercolour crayons, such as "NeoColour", add water. (Dry) #4 - From there fill those spaces with your doodle patterns.
Some other objects you could draw to get you started; Owl, Bird, Cup, Cat, Dog, Star, House, Angel,,, anything that you can already draw basically. If you're stuck trace your hand. Most of all,,, remember to have fun.

I hope these quick tutorials help you along the way to a doodle/art practice.  At the very least, I encourage you to go grab a colouring book, some pencil crayons and a cup of  coffee then get busy making some art.
Thanks again for joining me.
You're beuatiful!


Monday, June 17, 2013

Bountiful Beauties

If you're new to my blog, Welcome, come join me for a cup of coffee/tea. If you've been here a while thank you for coming back, the pot is always on. New friend, acquaintance or long time cherished friend, I hope my blog inspires you to find your own creative path and perhaps to begin your own art journal. The options for Art Journaling are endless, I can only share my styles, tips, tricks and techniques with you... My hope is that you fall in love with Art Journaling, search up other styles as well as mine and then find your own style.

I've been working on a series of women who express pure femininity. The theme I've chosen for these women is Bountiful Beauties; strong beautiful women, powerful affirmations, bold colors and of course sexy, stylized portraitures.

Steps 1-3
The methods are pretty simple and standard.

1) Prep your background with interesting ephemera.
2) Choose your colors and begin playing, adding layers and interest upon the page.
3) Sketch your Beauty in carbon, lightly, so you can still make corrections if needed.
4) Paint face, hair and body. My eyes are a combination of marker, pencil
Steps 4-5
crayon and acrylics.
5) Stamp, Stencil or paint in some big bold flowers or other interesting items to compliment                         your beauty.
Steps 6-8
6)Continue adding layers of color to hair, background and your beauty until you have the desired effect.
7) Stencil or write in your Affirmation.
8) Finish with bold black marker, white highlights and any other detail that captures your fancy.

You're AMAZING!
Keep practicing and pouring your heart into your Art Journals.
Remember it's your journal, if you want to journal in the background, in your beauties hair or underneath the paint in the early stages, DO IT! It adds interest and helps to add to the therapeutic part of Art and Art Journaling.

*Color
I simply love playing with different color combinations. I find it refreshing and exciting to put new and unconventional colors together...the end result always surprises me.

*Cheep Thrills
Buying a new bold color palate to me is such a rush.
The possibilities and fun to be had in those little paint tubes is a big thrill... I know, it's such an artsy thing to say. Sigh

*Journals
I use heavy weight Art Journals, but you can use lighter weight paper just gesso/mod podge two pages together. OR use old books~up-cycling is fun & thrifty.


*Affirmations
What speaks to you? What inspires you? What motivates you?

*Ooooops,
I realized after I had written the word "Soar" that there was a bunch of room underneath and the spacing didn't quite work... so I wrote the word, "High". But, amusingly I had already added the exclamation mark... so, it looks like I'm encouraging ppl to do drugs. NOT!
I amuse myself sometimes.

As always, it was so nice to see you and thank you again for stopping by.
Please share your work with me.
All the work on this blog is the sole property of Danine Mroz of Prairie Mroz Art and may NOT be used without the written permission of Ms. Mroz. Thank you.


Saturday, June 16, 2012

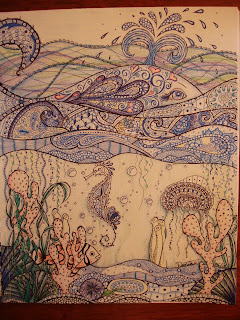
A Whale's Tale

I don't know what possessed me to take on a Doodle of this magnitude, but the little voice inside me head said Go For It. At 11x14 it's the biggest doodle I have ever done and it took me over 20 hrs to complete. The concept came from an underwater doodle I seen a while back and it sort of grew from that.

 Here it is along with a couple close ups. I hope you like it.


Sunday, June 10, 2012

Weekend Fun

My apologies for being absent for a while. Life and kids and stuff... you know how it goes. Sigh

I'm here to share with you some fabulous new Zen-Doodles. I hope you like them they're one of my favorite thing to do to pass the time on a rainy day, sitting having coffee, pretty much any time.

I was first introduced to the art of Zen-Doodling/Zentangling on the Milliande community art pages shared by other members. I was awe struck by how beautiful these creations were and how different and special each one was. I started searching the web for tutorials and found a good deal on YouTube. At first I was copying others (which is totally fine, you can use mine for inspiration is you like) and soon I was creating my own. I find my inspirations from men's ties, decorated boxes, clothing, books, etc. Designs are everywhere... just keep your eyes open.


The two main patterns here, the Zentangled Mooka (heart shapes) and the centre pattern I learned from YouTube videos courtesy of Rick Robert and Maria Thomas the founders of Zentangle. Their YouTube home is "Zentangle" and they have a lot of fantastic video's showing you how to create your own beautiful works. Many people find great peace and relaxation while doing this technique and use it as a form of Meditation... hence the name "Zen"-tangle. I know I could spend hours at my desk mindlessly creating Zendoodles, and I have. I find that the more I do the better I become at them... as with all art. The one area that I'm still not fantastic at with my Zendoodles is the shading in. But I will keep working on that. :D 


My second ZenDoodle is a combination of hearts, flowers and paisley's that are inspired by many amazing YouTube video's by "miraculousmosquito", her stuff blows me away. She has countless YouTube videos, "how to build" flowers, leaves, paisley... as well as some very interesting trees, and other shapes that are out of this world. I simply can't say enough about her... she is indeed "Miraculous". Along with Zentangles that I have picked up from "milliande" whom you can find on YouTube or at her art community site "milliande.ning.com" and share you work with others. :D Which I highly recommend by the way. The community is very encouraging and it has been wonderful getting to know other creative ppl from around the globe.


Lastly, my 'Flowers and Ribbon'. Yesterday I found a YouTube video by "rainbowelephant61" who, among other things, showed me how to create these fantastic ribbons. I wasn't sure what to do with them at first... so I thought, "Well, I love to do flowers" and that's what I did. I'm very happy with the results. I decided to do the ribbons in different colors and then keep to traditional black for the flowers. Just the thing I think. :D


So that's all. I hope you like them and check out the YouTubers and start creating some/more of your own. 
Cheers for now.
Danine


Wednesday, February 1, 2012

Reality Bits & Bites

Today I decided to step outside my comfort zone a little. Though I love drawing faces and sketching people the painting of a face is another story for me. It's a bit of a mystery to me and that really bites. Then there is the background... what the heck do I do with the background? The background always leaves me a bit frustrated. But, then I begin and I let my intuition take over and everything is ok with the Universe once again.
So  today I began my art journey by watching a couple Pam Carriker youTube videos on how to add portraits into your art Journal. Miss Carriker is a beautiful artist and gives amazing instruction (in case you're interested). But, her  videos are meant to entice you to sign up for her on-line art classes... I just don't have the patience or the cash flow to do that right now which also bites. Soooooo, I watch the video a few times through and do my best. In fact I feel that I learn a lot by doing it this way and the final product is more mine than if I took some on-line course.
The bit I find interesting is how during the process, I go from liking what I have created in the beginning, to not liking it in the middle and back to liking it by the end. Kind of a strange bit...

This is my process:
1) Draw a face and add some shading. You can also use an old book,
 or music sheets, etc to draw on,so you will see some 
of the words peaking through. 
(If you use a book or separate paper to draw your face, 
cut it out and mod podge it to your journal.)

2)Mix some Titan Buff with a little water and gel medium and paint over
 the face. While waiting for it to dry begin to add some soft colors 
to your background and some collage.

3)Blend two different skin tones into the titan buff. 
One to give you a high light and another to create a low light, 
then apply them accordingly to the areas of your portrait.

4)Do a little stamping or writing on your background to start creating depth.

5)Keep working your face and background until you have your desired affects.

Be patient with yourself. I find it useful to walk away for a bit and then come back to see my work with fresh eyes.
Live happy, Be creative, and Love Yourself!
Danine

Friday, January 27, 2012

How to Create a Fantastic Art Journal page

When I first began doing art journals I had no clue as to where to start or how to layer my work to give me the best results. I have watched countless tutorials, read several books and viewed many art journal pages, this is the process I have come up with "How to Create a Fantastic Art Journal page".

1) Begin by picking your palate. I usually work with three main colours and versions of them plus black & white. If you're a beginner it's a great idea to invest in a colour wheel, one that tells you which are complimentary colours etc.
Some of my favorite colour combo's are
- Black, White, & Red
- Pink, Yellow & White
- Teal, Cream & Purple
- Fuchsia, Lime Green, & Orange
- Brown, Sage & Rose
- Orange, Yellow & Blue
- Lime Green, Black & Hot pink
I hope you play with colour a little to see what colours appeal to you. Or go through some magazines and just pull pages that you are drawn to to find your colour palette.

2) Begin by applying a wash or glaze in the lightest colour. Start layering come colour, shades of existing colour and textures on top. Use you brushes, fingers, bubble wrap, insides of coffee holders, sponges, plastic bags, etc.
Paint Glaze= 1 part paint-2-3 parts water-1 part acrylic glazing medium Wash= paint + water to thin
*Note- always let each application DRY before adding another colour, unless you want the colours to blend. Too many colours blending together will make for a muddy looking page.

3) Add some texture and interest to your page by stamping some text, musical notes, or other interesting subject to the page. You can also put your personality into the page by drawing a picture of your own then painting it. I have also added decorated, stamped or coloured tissue paper at this point.

4) At this point you can begin adding collage or altered collage images to your page. You can select a theme or just use random pictures out of old magazines. You may also want to add some three dimensional pieces to your work; paper or cloth flowers, brads, beads, feathers, etc.

5) Next I add a bit more paint, often white or gesso in areas that I want to mute out and give a bit of pop. Or I will add low-lights in a darker colour or deeper shade of a colour that is already there to create more depth.

6) Doodle time. I keep pictures of doodles around to give me inspiration on my doodles. Just play and be creative, don't over think it.

7) Journal- a poem, your wishes and dreams, a letter to yourself or another loved one, song lyrics... it's your journal, what do you want to say?

At this point your pretty much done, you can always doodle a bit more or add some more highlights with a white gel pen  if you like, but that's it. I hope you have enjoyed making some art.

Cheers,
Danine


Friday, January 6, 2012

Sow thy Self

Seed Journal #3-2012 - S-Words

So I'm sitting in front of a blank piece of paper trying to think of "S"-words that are seed related and have meaning to me OR perhaps define me in some way, shape or form. And believe you me, it's a lot harder than it looks. These are the words that I was able to come up with; Serendipity, Seeds, Sow, Stand, Self, Signature, & Strong.


As always I wrote a short journal entry upon the finished work, today I used orange ink which blends quite nicely into the background.
As my skill as an artist becomes stronger
I feel a greater sense of self.
Life is full of happy accidents, in art this is especially true.
This year I hope to learn from these mistakes 
And maybe even create my signature style from one.
2012 is going to be an outstanding year!

So in short I hope to SOW the SEEDS of good STRONG habits to become a better artist in 2012. Learning new skills, finding my SIGNATURE style and simply being my Authentic SELF. Perhaps finding a little SERENDIPITY along the way as well.